Actually, using the layout and viewport already been discussed in TentangCAD. As in 5 easy steps to prepare AutoCAD plot. But it seems much less clear, because there are many who ask. This time I will try to translate it again. And this time using the training file, that can be directly tested and clearer. Please download the file first here.
Open the DWG file. In it there are several drawings, elevations, and pieces of a simple house designs.
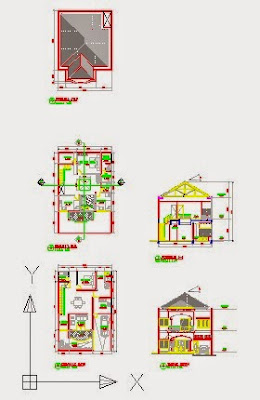
First let me remind you that the image was created using metric templates. And drawings were made in sizes mm. It is important to note that the standard depiction with AutoCAD metric is mm. And for imperial is inch. Of course you can draw with the units m, cm or more. But it seems just going to complicate your life alone. Unless you really need that size. Suppose you create a map of a city, of course you may not use the mm. More about this later.
Now we will try to create one layout to A4 size. Click the layout on the bottom left of your drawing area. layouts.jpg or by clicking the right QuickView layout in your status bar (AutoCAD 2009)

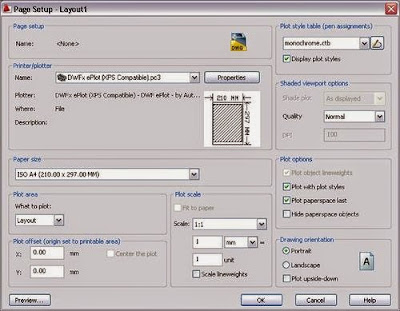
Once you move to layout1, select from the menu File> Page Setup Manager ... dialog box will open. Make sure layout1 elected, then click Modify in the right dialog.
Now select your printer in the printer / plotter. If you want to test it digitally, please try to use DWFx ePlot (XPS compatible) .pc3.
Define the ISO A4 paper size in the paper size. To use layout plot area. And the plot scale of 1: 1. Remember to use 1: 1 if you draw in mm! Lastly, make sure the drawing into a portrait orientation.
Now the size of the paper you've turned into A4. The dotted lines indicate the area that can be plotted.
Click the boundary of the viewport to select it. Now click the viewport scale at the bottom right, on the status bar. Choose a scale of 1: 100.

Pictures of the model will be transformed into a printed scale of 1: 100.
Double-click inside the viewport to activate the viewport. Pan up that looks just floorplans 1. Consider the scale of the viewport scale. Make sure the scale does not change when you perform pan (such as accidentally turning the scroll mouse).
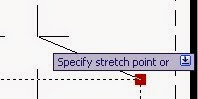
Double-click outside the viewport to return to the layout. Click the viewport boundary once again to change the size of the boundary. Click on the blue grip to adjust the size and position of the viewport.
Double-click inside the viewport to activate the viewport. Pan up that looks just floorplans 1. Consider the scale of the viewport scale. Make sure the scale does not change when you perform pan (such as accidentally turning the scroll mouse).
Double-click outside the viewport to return to the layout. Click the viewport boundary once again to change the size of the boundary. Click on the blue grip to adjust the size and position of the viewport.
Now you can add the label image, letterhead, or titleblock. Make sure all is in the dotted line.
Now click on the menu File> plot. Note that all the page setup settings similar to those you already do. Click OK to start printing. Easy is not it?
Now this is what I want to do. Created for each image on A4 layout. There are 5 pictures exist. In the next exercise we will make it in a sheet set, and I will introduce a 'batch plot' or print directly all document images in a single project, without opening them one by one.
One more practice, draw the pictures on one sheet A1. You can add a new viewport by typing MV and make the image rectangular.
Tag :
Tutorial AutoCad

0 Komentar untuk "Using exercises and Viewport Layout"