Preparing AutoCAD drawing to be printed is often a frustrating process for beginners. And often for senior users as well. I will try to discuss the usual way I teach in training to facilitate the printing process. On the way I use the layout for the representation of the picture.For annotation itself up to you, whether to use it on the layout, or use it on a model with annotation scale.Now I assume that the images to be printed already exist. If not, please look for examples of existing images to perform the following steps.Set Working UnitRule no. 1 is working with the appropriate unit. If you are working with the unit mm, you must set the UNITS be mm. If you create a new file, use a template with ISO standard.Keep in mind that AutoCAD only provide print scale for mm and inch. So this time, using mm for drawing objects with the actual size. If you draw a line 5m, draw a line along the 5000mm.Later, you might want to use the unit m or even km. But that's another story. This method will use all default AutoCAD.
Set Paper Size LayoutThe next is set right on the TAB layout.Klik size Layout1 (or the name of another layout that you want to change its size). Select the page setup manager from the context menu.
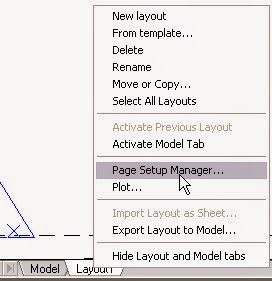
Click on the Modify dialog that opens later.
Choose the type of printer and paper size desired.
In part what to plot, select the layout.
Make sure the printed scale of 1: 1.
(Optional) Set the plot style table that will be used.Click OK.
Choose the type of printer and paper size desired.
In part what to plot, select the layout.
Make sure the printed scale of 1: 1.
(Optional) Set the plot style table that will be used.Click OK.
Add Border / Title BlockIf you've got a border for printing, can insert as a block here. Again, use the measure with a scale of 1: 1. So if the paper size A1 (841 x 594 mm), use a border with the size of the reduced margins. For example 821x554mm (please refer to the company's standards respectively).Position that lies in the area to be printed. The area to be printed is shown on the layout with the dotted line.
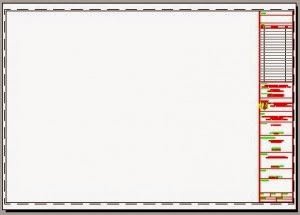
Create and organize Scale viewportThe final step is to make the viewport and scale. Make viewport by using MV. Then set the scale in a way that is shown in this post. There are other ways commonly used in AutoCAD older version, but this
tutorial is aimed so that reading can set printing as easy as possible.
Print ImagesBasically when printing, no one else should be set. Examine the plot preview to make sure everything is appropriate, and then click OK.As easy as counting 1,2,3,4,5!
Tag :
Tutorial AutoCad

0 Komentar untuk "Autocad, 5 Easy Steps to Prepare AutoCAD Plot"